

Get your colour just right
Get accurate results every time you print!
Streets Imaging makes no adjustment to the colour or density of your images unless you select “colour correction” when ordering. We know that you want to get the closest possible result to the editing and proofing you are seeing in your home, office or studio.
In order to get the closest result to your screen it is important to be working on a good quality desktop monitor that has been calibrated. When comparing your prints with your screen ensure you have optimal lighting (more details below).
Having the correct viewing conditions and editing set up coupled with our meticulous in-lab colour management systems, means you get perfect colour reproduction, regardless of whether you order today or next year.
We’re happy to help with your first couple of orders. If you’re unsure about file resolution, colour space, or format, our team can offer advice or check your files before printing. Our goal is to educate our Clients so they can order with total confidence and efficiency, for all future orders.
ICC profiles help ensure that what you see on screen closely matches what’s printed. They act as a set of instructions for what each paper and printer combination can accurately reproduce. We provide downloadable ICC profiles for our most popular papers so you can soft proof your images before ordering. This helps avoid issues like hue shifts or out-of-gamut colours during printing.
Both are archival and professional, but Giclée printing is generally preferred for reproducing artworks due to its painterly texture, deeper colour range, and media versatility. C-type printing is a great choice for photographers who want a classic photographic finish.
You can check your file’s colour space using Adobe Bridge. Open the file, and in the Metadata panel, you’ll see the embedded profile — for example, sRGB or Adobe RGB (1998). If no colour space is shown, the file may be a RAW or was saved without an embedded profile.
When exporting from RAW, your editing software lets you choose the colour space, this is when you should convert to the colour space you want for output (e.g. sRGB for lab printing). Then, make sure that the colour space is embedded in the file.
Converting adjusts the image data so colours appear consistent in the new space.
Embedding tells us what space the file is in, so we interpret it correctly when printing.
For best results, convert your file to the output colour space you’re targeting, and always embed that profile when exporting your final print-ready file.
Typically, we do not accept RAW files. Instead we would prefer to help you find your way in converting and editing these files.
If you’re capturing in the RAW format, RAW files do not have a colour profile listed, this is applied during the converting of the RAW files to JPEG or TIF. For work to be submitted to Streets Imaging, we recommend either sRGB or Adobe RGB 1998. It is critical that your files are tagged with the correct profile otherwise unpredictable results will occur.
We accept files in commonly used colour spaces such as sRGB and Adobe RGB (1998). Our system reads the embedded profile in your file and converts it to the correct output profile for your selected paper and printer.
To maintain accuracy, we recommend using a consistent colour space throughout your workflow — from RAW conversion through editing to final export. Then, embed that profile when saving your file. This ensures your colours are interpreted correctly and appear as you expect in the final print.
No. We don’t require you to download or install our printer profiles. You can work in a standard colour space like sRGB or Adobe RGB (1998) and export your files with that profile embedded.
Behind the scenes, we convert your image to the correct output profile based on the printer and paper you’ve selected. Each device and material (lustre, metallic, canvas, fine art paper, etc.) has its own calibrated profile, and our system applies the correct one automatically.
Why this works for you:
-
You don’t need to manage printer-specific profiles
-
Our software ensures accurate conversion for each output type
-
Profiles are updated in-house whenever printers or papers change
-
A consistent embedded working profile is all you need to supply
Note: RA-4 printers (used for C-type prints like lustre and metallic) have a smaller colour gamut than Adobe RGB. Some highly saturated colours, particularly greens, cyans, and blues, may not reproduce exactly as seen on screen. If you’re working in Adobe RGB and want more control, consider soft proofing using our ICC profiles.
This is for expert users only, contact Streets Imaging for a soft proofing profile for the paper type you are using. These profiles are solely for use in Photoshop/view/proof setup to give you an idea of any out of gamut colours that may occur in your image. They are for evaluation of an image only and are not to be used as a working space profile or unpredictable results will occur. This is not recommended for inexperienced users.
We work exclusively with RGB files for all output types, including photographic and fine art inkjet printing.
Our C-type prints are produced using red, green, and blue light to expose light-sensitive photographic paper, making RGB the appropriate colour mode for this process. Our fine art inkjet printers use extended ink sets with multiple greys, oranges, and other pigments, but are designed to receive RGB input for accurate colour reproduction.
Submitting CMYK files can result in colour shifts and unpredictable results because it bypasses the colour-managed conversion process. Additionally, our ROES ordering software does not support CMYK files — attempting to upload one will result in an error.
To ensure consistent and accurate prints, always work in RGB and embed your colour profile when exporting.
See images below for colour settings for sRGB and Adobe RGB 1998 in Photoshop and Lightroom…
Monitors should be calibrated approximately every 6 months.
The following settings are best used when calibrating your monitor for outputting to photographic print:
White point: D55 (D50 is a little warm for photographic print)
Luminance (Lux): 120K
Gamma: sRGB
When using a calibration device it’s best to use the automatic display control if that is an option.
Always make sure you are editing in a well lit room with any automatic brightness features turned off. Dark spaces can trick your eyes into thinking your screen is brighter than it actually is.
Please remember that a computer screen will not exactly match a photograph because of the different methods of generating the colours that are viewed. Computer screens emit light whereas the dyes in photographs absorb light and the paper base reflects light which is not absorbed. Consequently, it is important to view photographs under standard lighting conditions when trying to assess whether the colours match what was expected from the screen image.
How to Color Match Your ColorEdge Monitor and Photo Prints
For optimum results, it is recommended to use a high quality LED or LCD monitor. (A monitor with ability to control individual colours will give better results). It is important to purchase a high quality screen that has individual colour controls for calibration and profiling (please take care when selecting the screen as some models do not have the ability to select custom RGB controls meaning that calibration using a calibration device can be difficult).
We use Eizo LCD screens which can be calibrated and profiled to match our output closely. Laptop screens are not recommended for critical colour judgement because of the differences observed in the image at different viewing angles.
It is important to set up your monitor correctly. Streets Imaging recommend that if you are doing professional digital work that you invest in a monitor calibration device and calibrate your monitor regularly, as often as every 6 months. If you are receiving most of your income from photography, consider a calibration device as one of your “tools of trade”. We recommend and stock the X-rite i1 Display Pro, which can be purchased through our online ordering software.
PRINTS LOVE LIGHT!
The colour and density of a print is determined by the colour and quality of light falling on it. Viewing prints in a poorly lit room will not demonstrate the true colour and quality of a print. Streets Imaging recommend viewing photographs with a standard colour viewing light source available at professional graphic arts suppliers or professional photographic retailers. At the very least Streets Imaging recommend viewing with a compact fluorescent natural white. Incandescent (tungsten) bulbs are too yellow for critical viewing and standard fluorescent tubes have a gap in the red end of the spectrum giving a characteristic green cast to objects lit by them. As simple exercise take mental note and compare a print in dimly lit room to outside in full sun, what do you think about the exposure in that print? In a well lit room hold your print against a colourful wall or object, how do you feel about your skin tones now?
Walls, furniture even brightly coloured clothing can all impact the colour of an image. Avoid these or other outside objects that could bounce colour onto your screen or prints. Beware windows that allow daylight to enter the room, this will cause problems as the colour of the daylight will changes depending on the time of day and the weather.
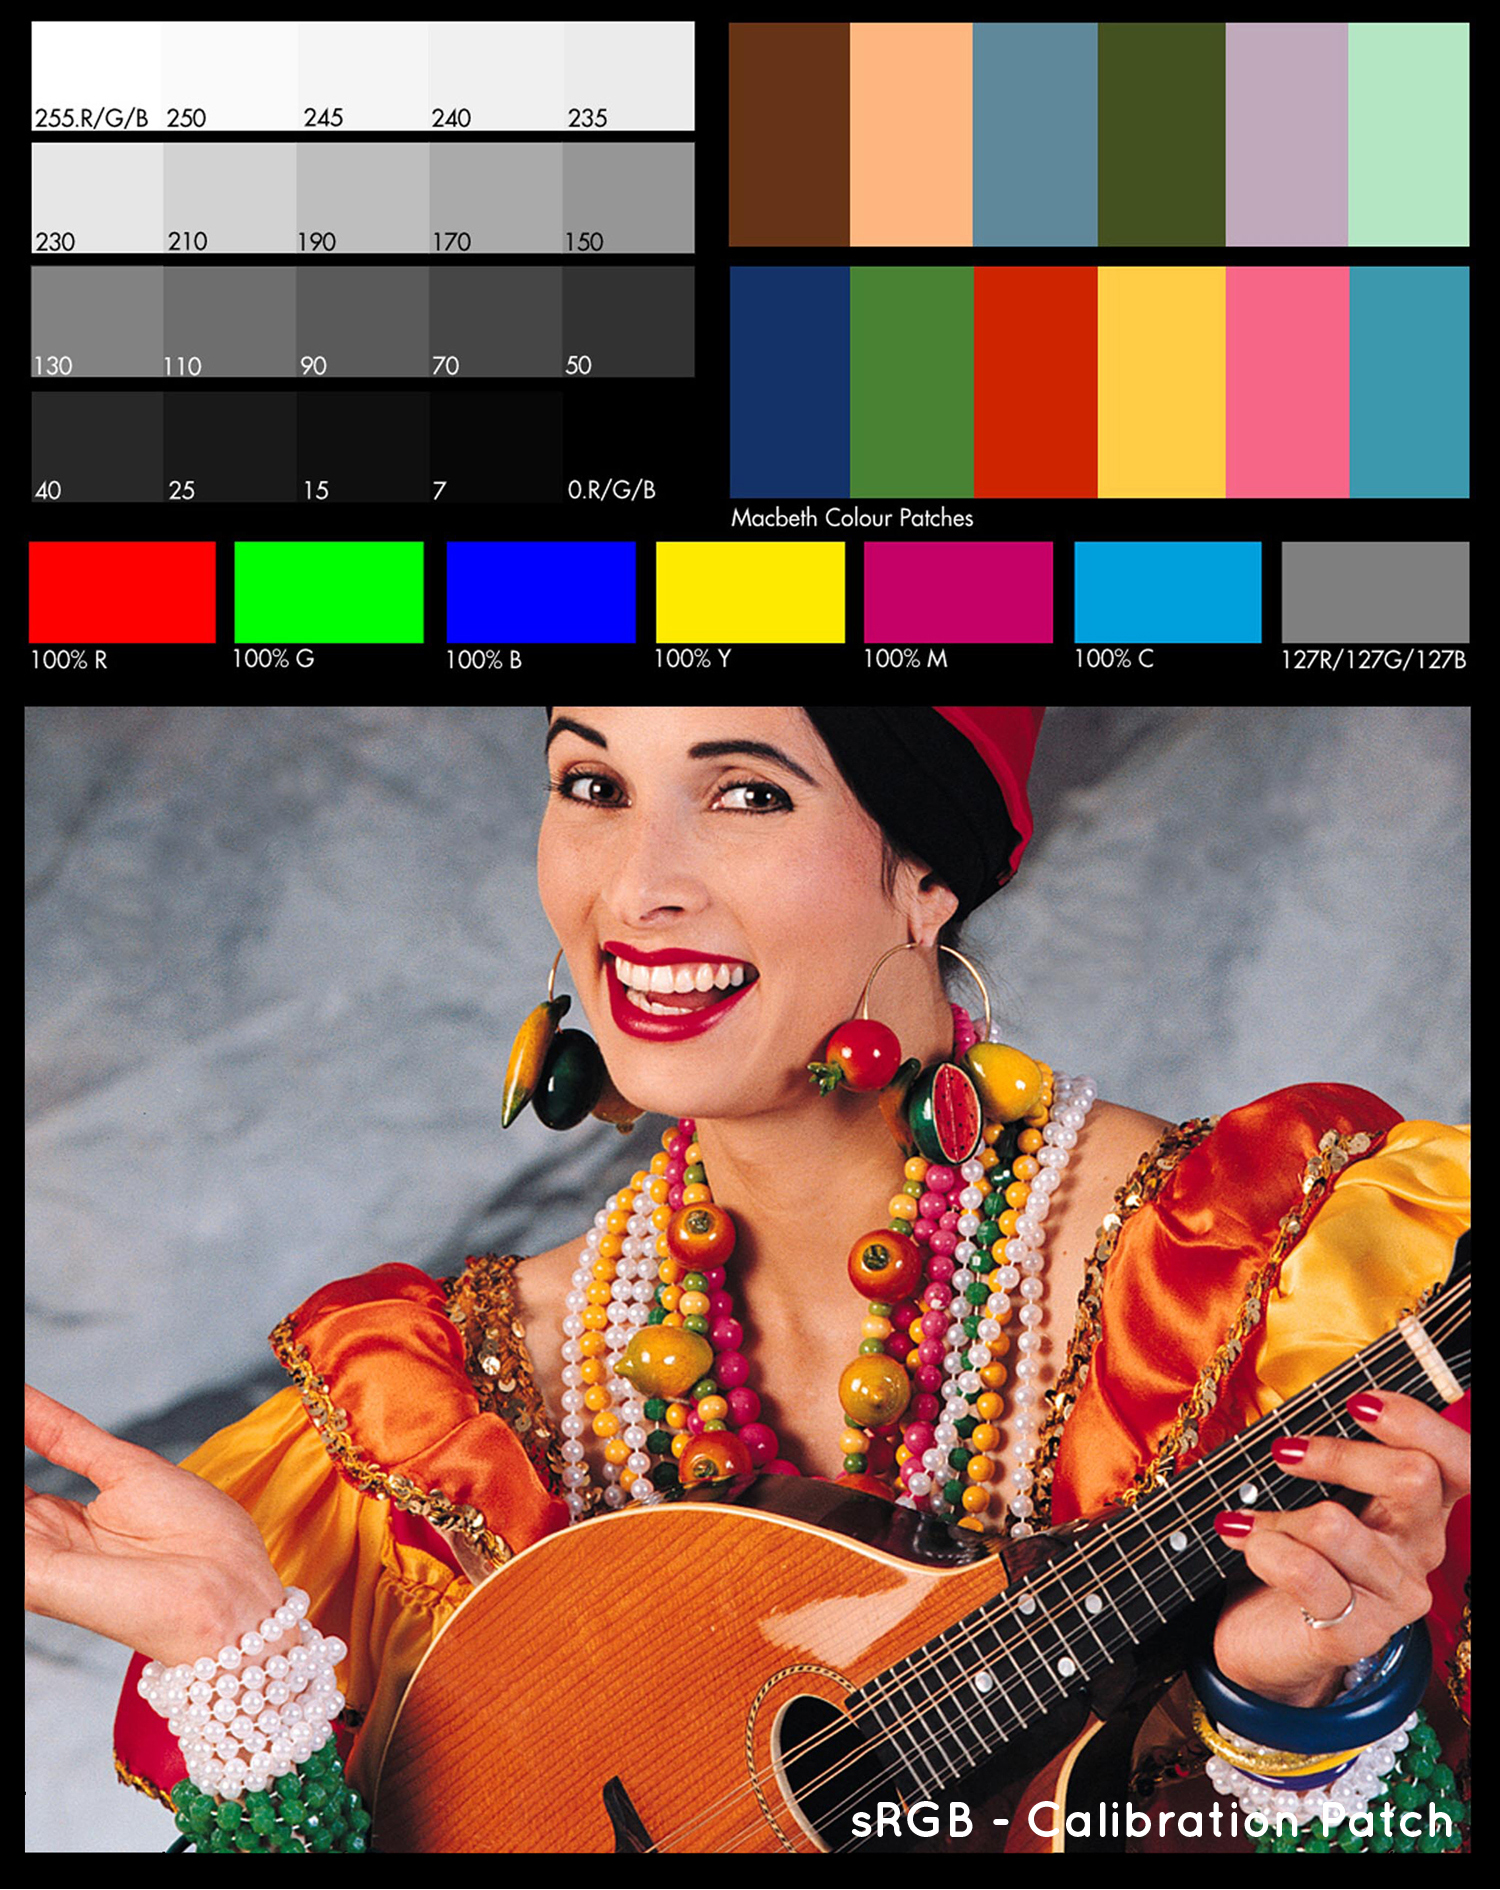
In 1978 Kodak used an image of a model named Shirley as their standard testing card/image. Since then every model used as a test image as adopted the nickname “Shirley”.
We can supply you with a printed “Shirley” and you can download the digital copy of the image here. This serves as a quick reference guide for you to check our printers’ output compared to your monitors calibration.
Along with the portrait demonstrating a range of colours and even skin tones is the 12 Macbeth colour patches, our printers’ 100% Red, Green, Blue, Cyan, Magenta and Yellow output and grey scale patches representing our printers density gamut.
The grey scale patches are an extremely useful tool as these demonstrate the values at which printers start to lose detail in the black and white most points of your image. For instance if you are concerned about loosing the fine details on a white wedding dress you can use the eyedropper tool in Photoshop and hover over the white most points of the image. If your RGB values for that area sit above 245 you may risk loosing detail and will need to adjust the white point in your levels. Likewise with darker areas of your print, if the values all sit below 10 where there should be details – your black point will need to be brought up a few increments.

We strongly suggest purchasing your own monitor calibration device. Streets recommends the X-rite i1 which you can purchase online from our Streets Online Ordering Software.
Streets Imaging offer a monitor calibration service for local clients using the X-rite i1 which also includes advice on lighting conditions and workflow management and a whole lot more! Interstate clients can hire our loan X-rite i1. Contact us to find out more about our screen calibration service.
The colour of your print is determined by the dyes in the print and the colour and amount of light falling on the print.
The colour of your image on the screen is determined by the setup of your monitor regarding brightness, white point and contrast.
Unless these variables are set correctly, you will not be able to get the image on the screen to match the image on your print. Consequently, correct viewing conditions for your print and a calibrated monitor are a basic necessity. Find out more about colour management or contact our staff to discuss.
If you would like your files checked prior to production, select ‘Colour Correction’ as you proceed through the check out and let our staff know specifically what you are concerned about in the ‘Notes to lab’ and if you want us to make any adjustments to the colour or density of your images.
Using this will charge you 50 cents per image. Our workflow is fully automated, which allows us to give you such great prices and turnaround on your orders. By default no files are checked prior to printing unless they are a large format item and that is still not guaranteed. Please ensure the files you send are set up for digital output and follow our file preparation requirements. Any reprints that need to be done due to files sent incorrectly sized or with editing errors will be at the Customers expense.
Our printers print at 300 pixels per inch. So you can work out the best print size for your file by dividing the pixel width and height of the image by 300.
Eg. an image that is 3600 x 5400 is sized to print (3600/300) x (5400/300) = 12″ x 18″.
You can get a good indication of your print quality by viewing it on your computer at 100%. If you start to zoom in closer you will see the kind of quality you will get when you enlarge its print size.
Another thing to take into account is the distance of view for your print. See the example below – the image on the left has half the pixels of the one on the right which is why it looks like it has less definition. But as you move away from the two images the difference in image quality becomes a lot less obvious.

When images are saved for print it is important to make sure that the jpeg compression is set at its highest quality. Reducing the compression quality could result in images with compression banding and a loss of image sharpness.
WHY DON’T YOU
Try us our for FREE!
Streets Imaging offers four free 5×7″ lustre prints or one free 5×7″ fine art print for your first test so that you can have a look at our colour reproduction, your colour management, try out our software and test out delivery times. We will also include paper samples and a Shirley for your reference!