
Lets talk about image cropping!
You’ve uploaded your photo, chosen a print size and suddenly the top of someone’s head is missing.
Don’t panic.
Nothing has happened to your file. Your photo is being cropped because the shape of the image doesn’t match the shape of the print size you’ve chosen.
It comes down to the shape of your image:
The shape of an image is described by its aspect ratio. This is simply the relationship between its width and height.
The tricky part is that digital images don’t all come in the same shape, and neither do standard print sizes.
For example, a phone, DSLR or mirrorless camera image may be 2:3, while files from many digital and compact cameras are 4:3. Popular print sizes such as 5 × 7 and 8 × 10 inches have different proportions again.
When the shape of your image doesn’t match the shape of the print, one of two things has to happen:
- part of the image is cropped so it fills the whole print, or
- the whole image is shown with white space around the edges
There’s nothing wrong with the image or your chosen print size. They just don’t match exactly.
What happens when you add your image in the Streets Online Ordering Software (ROES)?
When you drag your image into a print template, ROES will fill the whole print by default.
This means you won’t accidentally end up with white edges, but it can also mean part of your image sits outside the print area.
To check what is being cropped, click and hold on the image.
You’ll see a faded preview of the areas sitting outside the template in the desktop software, just missing in the web ordering system. These parts will not appear in the finished print.
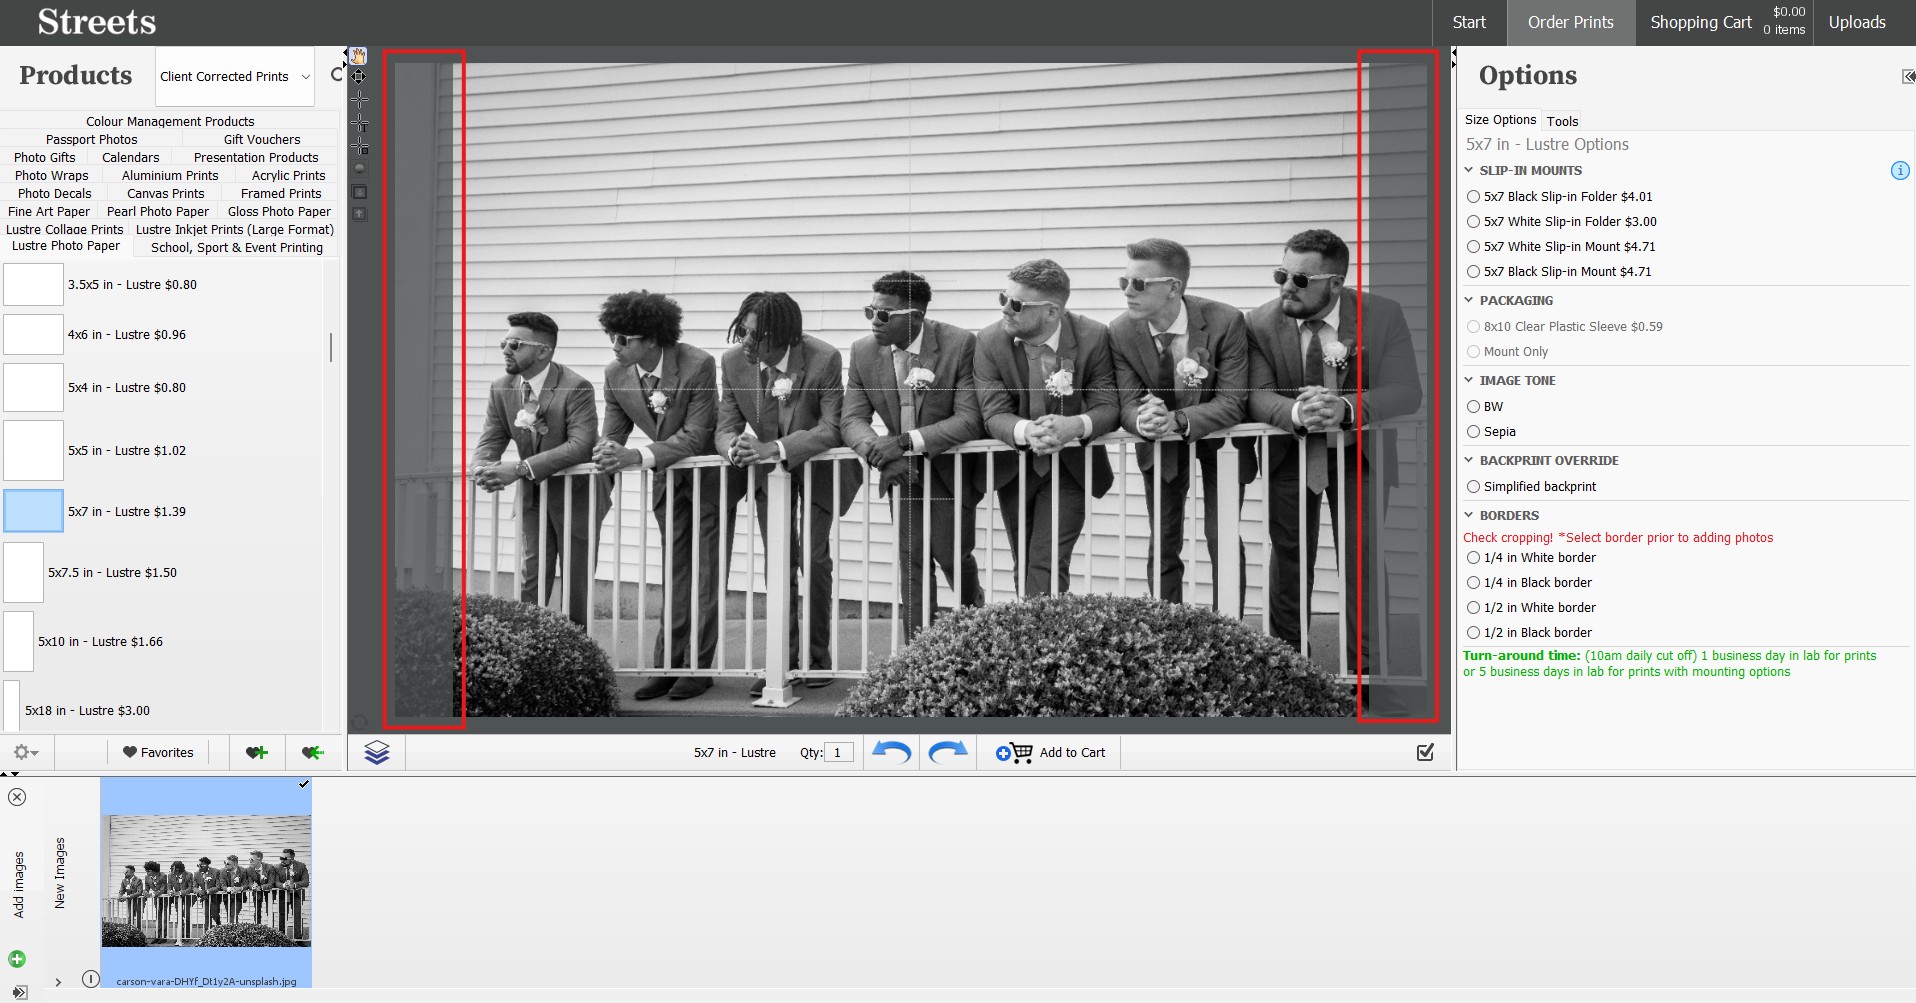
SOOS ROES Desktop Cropping Preview
You can adjust the crop
You don’t have to leave the image exactly where ROES puts it.
You can move the image around inside the template, zoom in or out, and tilt it slightly to straighten a horizon or vertical line.
This gives you control over where the crop falls.
It’s worth checking anything close to the edge, especially:
- faces
- hands and feet
- text
- artwork signatures
- objects you don’t want to lose
A small adjustment using the tools highlighted below can make a big difference to the finished composition.
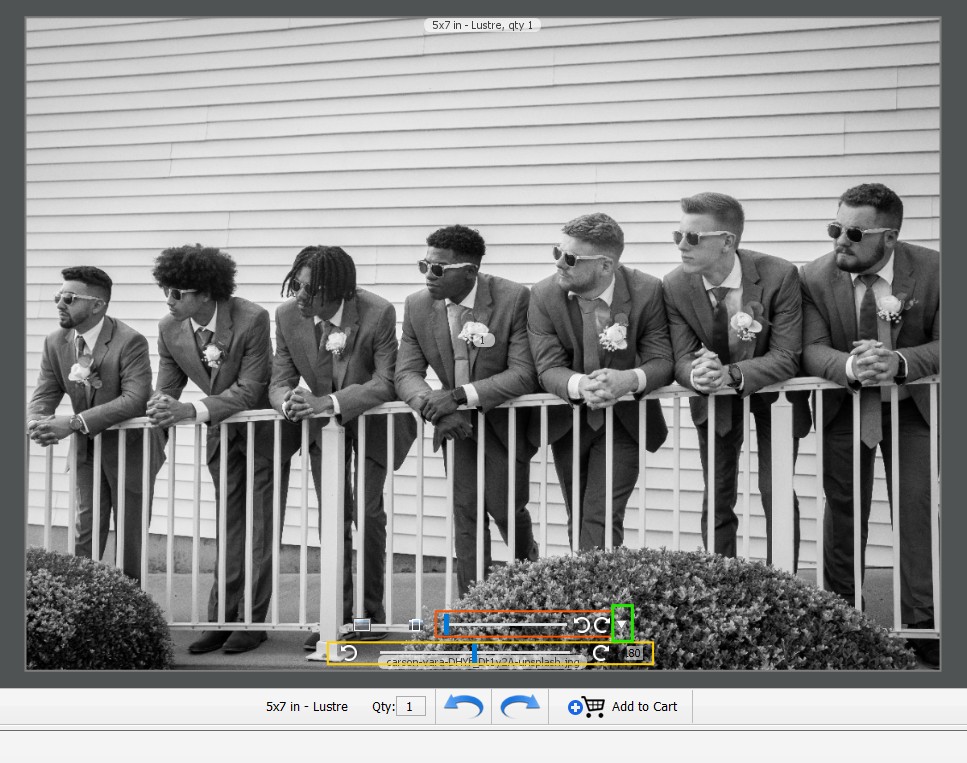
SOOS ROES Desktop Zoom and Rotate Tools
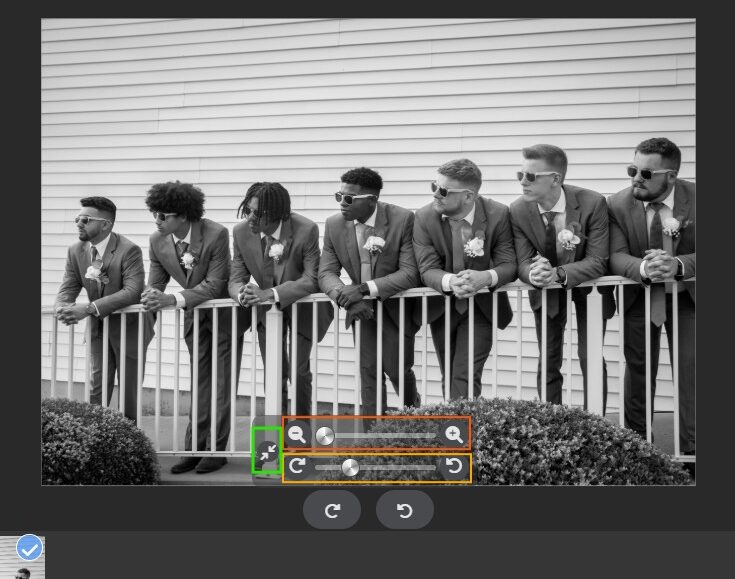
SOOS ROES Web Zoom and Rotate Tools
What if you want the whole image to show?
Click the fit image icon.
This places the whole image inside the print template. Because the image and print are different shapes, you may see white edges at the top and bottom or down the sides.
Those white edges will print. They are not removed automatically.
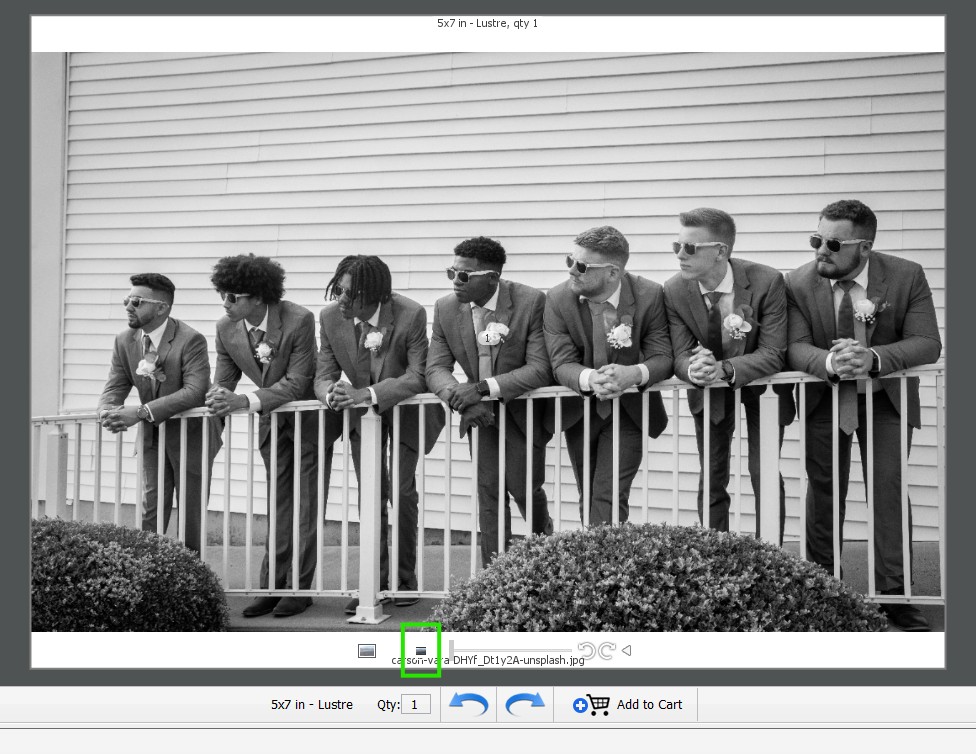
SOOS ROES Desktop Fit Image Tool
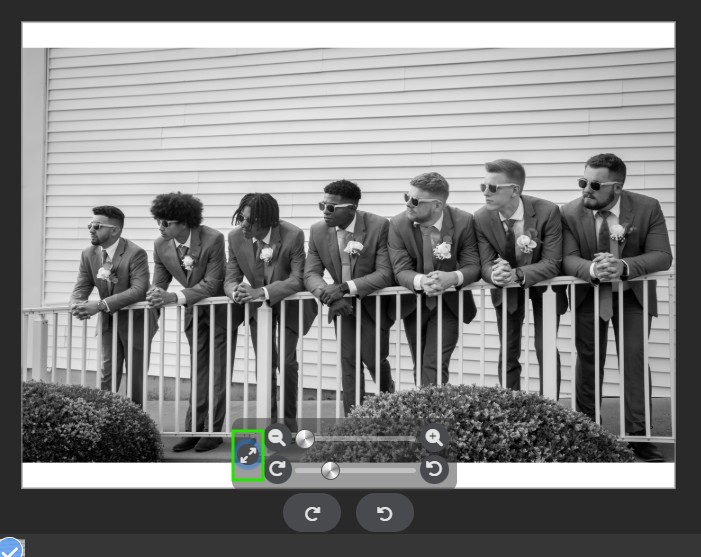
SOOS ROES Web Fit Image Tool
Fill or fit?
The easiest way to think about it is:
Fill
The image covers the whole print, but some of it may be cropped.
Fit
The whole image stays visible, but you may have white edges.
Neither option is wrong. It depends on what suits the image best.
Sometimes a small crop improves the composition. Other times, keeping every part of the image matters more. If you’re printing an image to fit a frame you already have, filling the full image looks best.
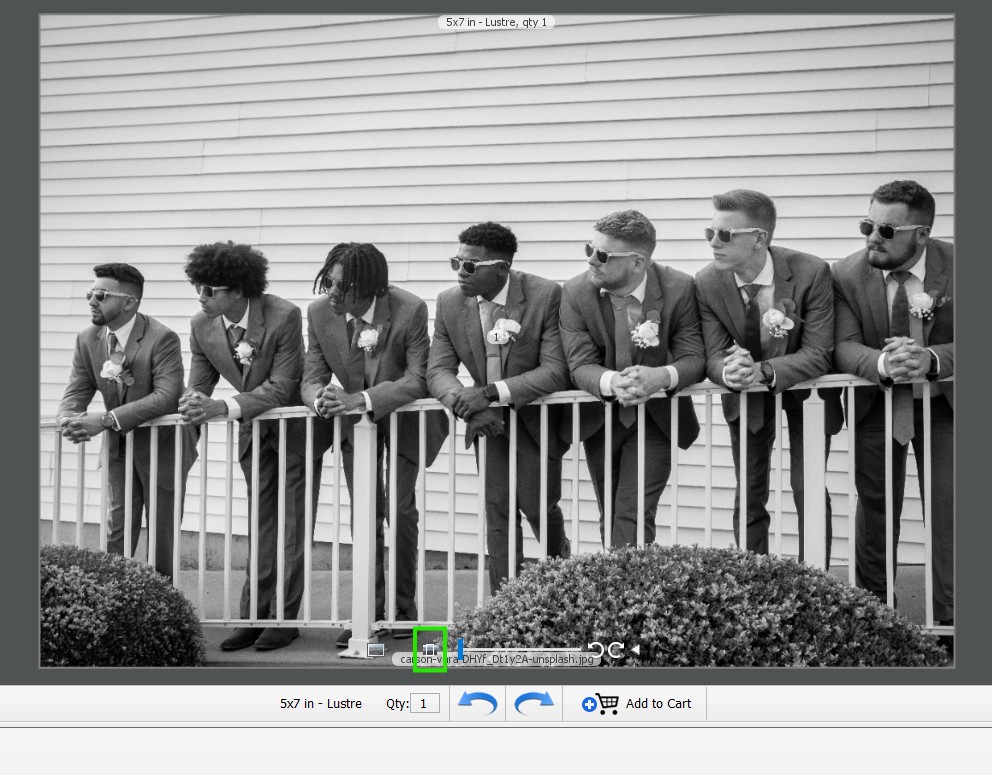
SOOS ROES Desktop Fill Image Tool
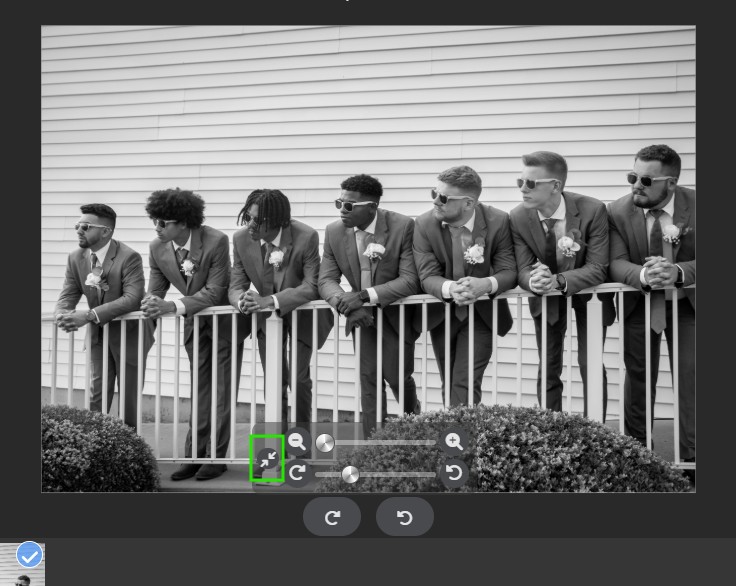
SOOS ROES Web Fill Image Tool
What shape is your image likely to be?
You don’t need to know the aspect ratio of your file before you start. Where the image came from can usually give you a good idea.
Keep in mind that an image may already have been cropped during editing, so its current shape may be different from the original camera file.
2:3 images
A 2:3 ratio is common for phone images, DSLR and mirrorless camera files. It is also the shape of traditional 35mm film.
Matching lustre print sizes available from Streets include:
- 4 × 6 inches
- 6 × 9 inches
- 8 × 12 inches
- 10 × 15 inches
- 12 × 18 inches
- 16 × 24 inches
- 20 × 30 inches
- 24 × 36 inches
A 2:3 image can fill these sizes without cropping, provided the file hasn’t already been cropped to a different shape.
Choose a size such as 5 × 7 or 8 × 10 inches and the proportions change, so a little of the image will need to be cropped or the full image can be fitted with white edges.
4:3 images
A 4:3 ratio is common with files from many digital and compact cameras.
You may also see this written as 3:4. It is the same shape, just turned from landscape to portrait.
Matching lustre print sizes available from Streets include:
- 6 × 8 inches
- 9 × 12 inches
- 12 × 16 inches
There are fewer standard photographic print sizes in this ratio, so a 4:3 image will often need a small crop when ordered at another popular size.
5:4 images
A 5:4 ratio is a little squarer again.
This shape is commonly used for traditional portrait sizes and images that have been cropped specifically for prints such as 8 × 10 inches. They are also common pre-fabricated frame sizes.
Matching lustre print sizes available from Streets include:
- 4 × 5 inches
- 8 × 10 inches
- 16 × 20 inches
- 20 × 24 inches
A 2:3 or 4:3 image placed into one of these sizes will need more cropping than it would in a closer-fitting print ratio.
Square images
A 1:1 ratio is square.
Square files are common with images cropped for Instagram, artwork created in a square format or photos deliberately edited that way.
Matching square sizes available from Streets include but are not limited to:
- 5 × 5 inches
- 6 × 6 inches
- 8 × 8 inches
- 10 × 10 inches
- 11 × 11 inches
- 12 × 12 inches
- 14 × 14 inches
- 20 × 20 inches
- 22 × 22 inches
Place a square image into a rectangular print and you’ll either lose part of the image or have white space around it.
Wide images, screenshots and panoramas
Some files are much longer or wider than standard print sizes.
These can include:
- panoramas
- images saved from video
- photos taken using a wide camera setting
- images cropped for social media, banners or screens
These images can need a fairly heavy crop when placed into a standard print template.
Using the fit image option will keep the whole file visible, but it may leave much larger white edges than you expected.
For a panorama or unusually wide image, choosing a longer print size will usually make better use of the file.
Can you avoid cropping altogether?
Often, yes.
The easiest option is to choose a print size with the same proportions as your image. This allows the photograph to fill the print without losing anything from the edges.
That doesn’t mean you have to choose a perfectly matching size. A 5 × 7 or 8 × 10 may suit your frame, album or wall better.
You’ll simply need to adjust the crop or choose to print the full image with white edges.
What if none of the standard sizes suit?
Sometimes an image has a particular shape that doesn’t line up neatly with a standard print size.
Our fine art prints and canvas prints are available in custom sizes, which can be useful for:
- panoramic photographs
- unusually shaped artwork
- images prepared for a particular frame or wall space
- compositions where you don’t want to crop any of the original image
Get in touch with us if you have a specific size in mind and we can help you work out what is possible.
Not sure whether your file has enough resolution for the size you want? Read our guide to how big you can print your image.
Check the preview before you order
The print template shows you how your finished print will look, so take a moment to check it before adding it to your cart.
Click and hold to see what is being cropped, move or zoom the image where needed, and use the fit icon if you want to keep the whole photo visible.
A quick check now can save you from wondering where the top of Dad’s head went later.
Ready to print? Order now and choose the print size that suits your image.
Lets talk about image cropping!
You’ve uploaded your photo, chosen a print size and suddenly the top of someone’s head is missing.
Don’t panic.
Nothing has happened to your file. Your photo is being cropped because the shape of the image doesn’t match the shape of the print size you’ve chosen.
It comes down to the shape of your image:
The shape of an image is described by its aspect ratio. This is simply the relationship between its width and height.
The tricky part is that digital images don’t all come in the same shape, and neither do standard print sizes.
For example, a phone, DSLR or mirrorless camera image may be 2:3, while files from many digital and compact cameras are 4:3. Popular print sizes such as 5 × 7 and 8 × 10 inches have different proportions again.
When the shape of your image doesn’t match the shape of the print, one of two things has to happen:
- part of the image is cropped so it fills the whole print, or
- the whole image is shown with white space around the edges
There’s nothing wrong with the image or your chosen print size. They just don’t match exactly.
What happens when you add your image in the Streets Online Ordering Software (ROES)?
When you drag your image into a print template, ROES will fill the whole print by default.
This means you won’t accidentally end up with white edges, but it can also mean part of your image sits outside the print area.
To check what is being cropped, click and hold on the image.
You’ll see a faded preview of the areas sitting outside the template in the desktop software, just missing in the web ordering system. These parts will not appear in the finished print.
SOOS ROES Desktop Cropping Preview
You can adjust the crop
You don’t have to leave the image exactly where ROES puts it.
You can move the image around inside the template, zoom in or out, and tilt it slightly to straighten a horizon or vertical line.
This gives you control over where the crop falls.
It’s worth checking anything close to the edge, especially:
- faces
- hands and feet
- text
- artwork signatures
- objects you don’t want to lose
A small adjustment using the tools highlighted below can make a big difference to the finished composition.
SOOS ROES Desktop Zoom and Rotate Tools
SOOS ROES Web Zoom and Rotate Tools
What if you want the whole image to show?
Click the fit image icon.
This places the whole image inside the print template. Because the image and print are different shapes, you may see white edges at the top and bottom or down the sides.
Those white edges will print. They are not removed automatically.
SOOS ROES Desktop Fit Image Tool
SOOS ROES Web Fit Image Tool
Fill or fit?
The easiest way to think about it is:
Fill
The image covers the whole print, but some of it may be cropped.
Fit
The whole image stays visible, but you may have white edges.
Neither option is wrong. It depends on what suits the image best.
Sometimes a small crop improves the composition. Other times, keeping every part of the image matters more. If you’re printing an image to fit a frame you already have, filling the full image looks best.
SOOS ROES Desktop Fill Image Tool
SOOS ROES Web Fill Image Tool
What shape is your image likely to be?
You don’t need to know the aspect ratio of your file before you start. Where the image came from can usually give you a good idea.
Keep in mind that an image may already have been cropped during editing, so its current shape may be different from the original camera file.
2:3 images
A 2:3 ratio is common for phone images, DSLR and mirrorless camera files. It is also the shape of traditional 35mm film.
Matching lustre print sizes available from Streets include:
- 4 × 6 inches
- 6 × 9 inches
- 8 × 12 inches
- 10 × 15 inches
- 12 × 18 inches
- 16 × 24 inches
- 20 × 30 inches
- 24 × 36 inches
A 2:3 image can fill these sizes without cropping, provided the file hasn’t already been cropped to a different shape.
Choose a size such as 5 × 7 or 8 × 10 inches and the proportions change, so a little of the image will need to be cropped or the full image can be fitted with white edges.
4:3 images
A 4:3 ratio is common with files from many digital and compact cameras.
You may also see this written as 3:4. It is the same shape, just turned from landscape to portrait.
Matching lustre print sizes available from Streets include:
- 6 × 8 inches
- 9 × 12 inches
- 12 × 16 inches
There are fewer standard photographic print sizes in this ratio, so a 4:3 image will often need a small crop when ordered at another popular size.
5:4 images
A 5:4 ratio is a little squarer again.
This shape is commonly used for traditional portrait sizes and images that have been cropped specifically for prints such as 8 × 10 inches. They are also common pre-fabricated frame sizes.
Matching lustre print sizes available from Streets include:
- 4 × 5 inches
- 8 × 10 inches
- 16 × 20 inches
- 20 × 24 inches
A 2:3 or 4:3 image placed into one of these sizes will need more cropping than it would in a closer-fitting print ratio.
Square images
A 1:1 ratio is square.
Square files are common with images cropped for Instagram, artwork created in a square format or photos deliberately edited that way.
Matching square sizes available from Streets include but are not limited to:
- 5 × 5 inches
- 6 × 6 inches
- 8 × 8 inches
- 10 × 10 inches
- 11 × 11 inches
- 12 × 12 inches
- 14 × 14 inches
- 20 × 20 inches
- 22 × 22 inches
Place a square image into a rectangular print and you’ll either lose part of the image or have white space around it.
Wide images, screenshots and panoramas
Some files are much longer or wider than standard print sizes.
These can include:
- panoramas
- images saved from video
- photos taken using a wide camera setting
- images cropped for social media, banners or screens
These images can need a fairly heavy crop when placed into a standard print template.
Using the fit image option will keep the whole file visible, but it may leave much larger white edges than you expected.
For a panorama or unusually wide image, choosing a longer print size will usually make better use of the file.
Can you avoid cropping altogether?
Often, yes.
The easiest option is to choose a print size with the same proportions as your image. This allows the photograph to fill the print without losing anything from the edges.
That doesn’t mean you have to choose a perfectly matching size. A 5 × 7 or 8 × 10 may suit your frame, album or wall better.
You’ll simply need to adjust the crop or choose to print the full image with white edges.
What if none of the standard sizes suit?
Sometimes an image has a particular shape that doesn’t line up neatly with a standard print size.
Our fine art prints and canvas prints are available in custom sizes, which can be useful for:
- panoramic photographs
- unusually shaped artwork
- images prepared for a particular frame or wall space
- compositions where you don’t want to crop any of the original image
Get in touch with us if you have a specific size in mind and we can help you work out what is possible.
Not sure whether your file has enough resolution for the size you want? Read our guide to how big you can print your image.
Check the preview before you order
The print template shows you how your finished print will look, so take a moment to check it before adding it to your cart.
Click and hold to see what is being cropped, move or zoom the image where needed, and use the fit icon if you want to keep the whole photo visible.
A quick check now can save you from wondering where the top of Dad’s head went later.
Ready to print? Order now and choose the print size that suits your image.